The Modern Ukulele Method Online Instructor for Beginners and Advanced Students Page: 156
An Illustrated Uke tutorial with Songs, Sheet Music & Chords by May Singhi Breen
(the original Ukulele Lady).
| Share page | Visit Us On FB |
|
GLISSANDO EFFECTS
Glissando. (This sign will be used to indicate sliding from one chord position
to the other.) Every time you take your finger off the strings to play another chord posi-
tion, you break the tone (or, disconnect the sound). Sliding from one chord formation to another connects them so that there will be little or no pause in the sound. EXERCISE 1
Here is the first exercise recommended for perfecting the slide tones.
 |
||
 |
||
|
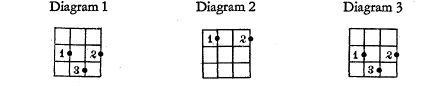
When you slide back from the A chord (diagram 1) lift the 3rd finger
and slide back quickly to the "A diminished" position without releasing the 1st and 2nd fingers which must always be held firmly against the strings. When you have mastered the above exercise try:
EXERCISE 2 |
||
 |
||
|
From diagram 3 to 4 turn the wrist and 1st finger to a more vertical posi-
tion and slide quickly to the 3rd fret. You must keep playing the same stroke you are using with the right hand or the effect will be lost. Try changing from one diagram to the other in exercise 2 but practice doing it with only one beat to a chord. (In other words Down-up). The common stroke is really the best way to practice this exercise. |
||
 |
||
|
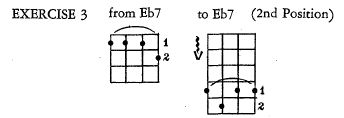
When you make your slide, release the 2nd finger and slide 1st finger to
the 4th fret. Then quickly press the 2nd finger on the 3rd string at the 5th fret. This is the 2nd position of Eb 7 Continue strumming while you slide. When the 1st position of a chord is different in formation from the next
position, form the position you are going to slide to before you start to slide. Examples: |
||
 |
||